Are you trying to fix issues with WordPress search not working on your website?
While WordPress comes with basic search feature, it has some common errors and limitations that can keep your visitors from finding what they’re looking for.
In this post, we’ll show you how to fix problems with WordPress search not working.

Why Do WordPress Search Errors Happen?
Most websites have a search feature that helps visitors find interesting content on your WordPress blog or products that they may want to buy on your online store.
However, WordPress’ built-in search feature is very basic.
By default, it doesn’t search all types of content such as comments, reviews, or custom post types. This may stop the visitor from finding what they’re looking for.
The built-in search also focuses on matching search words with the post or page content without paying attention to things such as tags, categories, or custom fields. This is important information that can help your visitors get more accurate search results.
Lastly, there’s no easy way to customize the built-in search. For example, if you wanted to prioritize a post’s titles over its excerpt, or exclude certain pages from WordPress search, you would need to edit the code.
With that in mind, let’s look at how you can easily fix common problems with WordPress search not working. Simply use the quick links below to jump straight to the issue you’re having with WordPress search.
- How to fix WordPress search box not appearing
- How to fix WordPress search showing 404 error
- How to fix WordPress search showing irrelevant results
- How to fix WooCommerce product search not showing accurate results
- How to fix slow WordPress search
How to Fix WordPress Search Box Not Appearing
While WordPress has built-in search feature, not all themes may come with a search bar design. If your theme doesn’t come with a search bar, then there are a few ways that you can create one.
You can add a Search block to any widget-ready area of your WordPress website such as the header or footer. This is a quick and easy way to show a search bar across every page of your WordPress site.
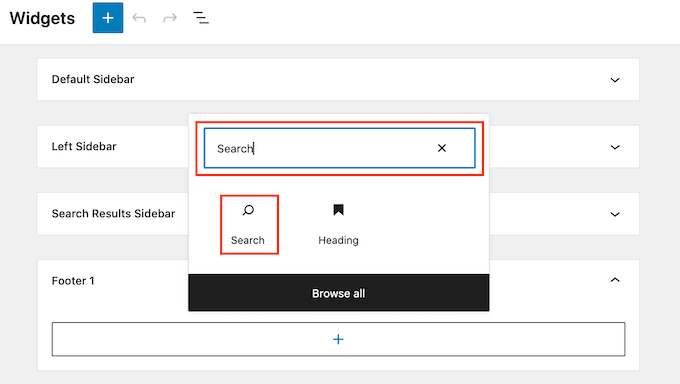
To add a Search block, simply go to Appearance » Widgets. You can then find the area where you want to add a search bar, and click on its arrow icon to expand.

Then, just click on the + icon.
In the popup that appears, type in ‘search’ and then select the Search block.
Once you’ve done that, you can customize the Search block using the row of icons that appears above the block. This includes changing the size of the search button and adding some text.
When you’re happy with how your Search block looks, go ahead and click on the ‘Update’ button. You can now visit your website to see the search bar live.
Another option is adding the Search block to a specific page or post. For example, you might just want to show a search bar on your homepage or landing page.
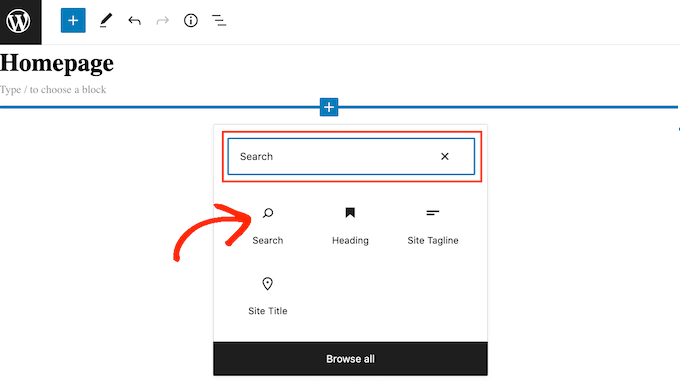
To do this, just open the page or post where you want to show your search bar. You can then click on the + icon and add a Search block following the same process described above.
WordPress’ ready-made Search block is an easy way to add basic search to your site. However, if you want complete control over how your search bar looks and acts, then you’ll need a page builder plugin.
SeedProd is the best drag and drop page builder for WordPress and comes with over 80 professionally-designed blocks including a Search Form block. This allows you to instantly add a search bar to any area of your WordPress website.
All you need to do is open SeedProd’s editor and then drag and drop the Search Form block into place on your website’s layout.
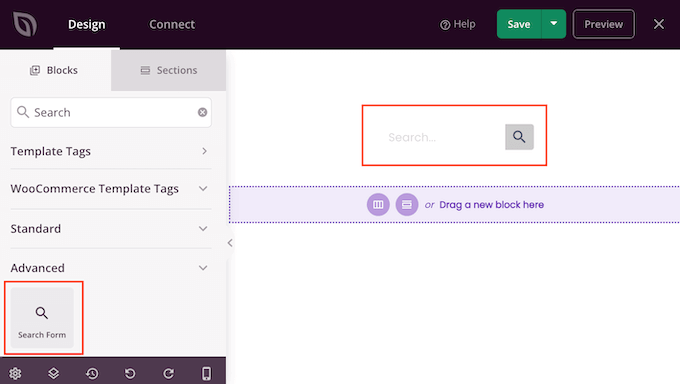
Once you’ve done that, you can customize it using all the settings in the left-hand menu.
Once you’ve added a search bar, you can use the SeedProd theme builder to design a completely custom search results page that perfectly matches your brand. For more information, please see our guide on how to easily create a custom WordPress theme.
How to Fix WordPress Search Showing 404 Error
When a visitor performs a search, your site may show a 404 error such as ‘This page could not be found!’

You can often fix 404 errors by regenerating your permalinks. This rebuilds and repairs the WordPress permalink structure without changing anything on your site.
This may sound complex, but WordPress does all of the hard work for you.
To regenerate your permalinks, simply go to Settings » Permalinks.
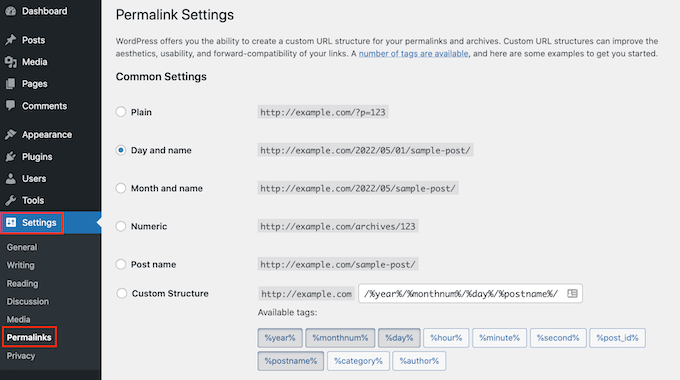
Then, scroll to the bottom of the page and click on the ‘Save Changes’ button.
That’s it. WordPress will now regenerate your permalink structure. To make sure it worked, head over to your site and try performing a search.
For a more detailed look at rebuilding your permalink structure, see our complete guide on how to regenerate your permalinks in WordPress.
How to Fix WordPress Search Showing Irrelevant Results
Every time a visitor performs a search, you’ll want to show relevant search results. This helps visitors find interesting content, which will keep them on your site for longer and increase your sales and conversions.
However, the built-in WordPress search doesn’t always show the most accurate results. This is because it looks for the search term in your post’s title and content only.
With that in mind, we recommend installing an advanced search plugin.
SearchWP is the best custom search plugin for WordPress, used by over 30,000 websites. SearchWP can search every part of your site including custom fields, WooCommerce products, categories and tags, PDF files, and more.
You can use SearchWP to adjust your website’s search algorithm and make sure your most important content appears at the top of the visitor’s search results.
The first thing you need to do is install and activate the SearchWP plugin. For more details, see our step by step guide on how to install a WordPress plugin.
Upon activation, click on the new ‘SearchWP’ button in your website’s toolbar. You can then go ahead and click on ‘Activate License.’

Once you’ve done that, click on the ‘License’ tab.
You can now either paste or type your license into the ‘License’ box. You’ll find this key in the email you got when you purchased SearchWP.
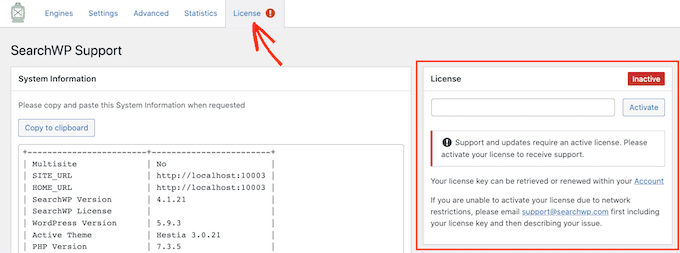
After that, go ahead and click on the ‘Activate’ button.
SearchWP integrates with WordPress search automatically, so right away your site will start showing more accurate results. However, to get the best results you’ll want to customize SearchWP’s search engine settings.
Here it helps to think about the way that search engines such as Google rank their content.
These search engines use algorithms to find high-quality content that closely matches the search term. It then ranks this content to make sure the best matches appear at the top of the search results page.
With SearchWP you can build your own algorithms and set your own rules, just like Google. This can improve the visitor experience, boost your conversions, and help you make money online with WordPress.
To configure SearchWP’s settings, click on the ‘Engines’ tab.
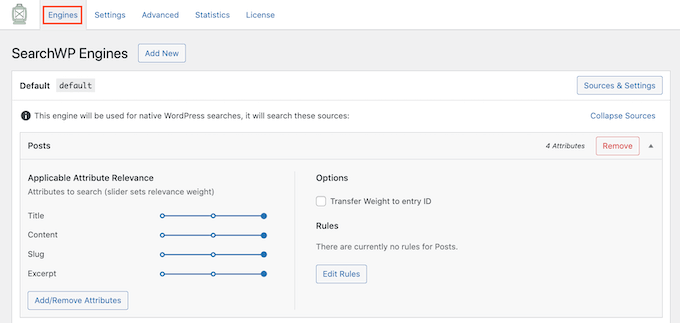
On this screen, you’ll see sections for the different types of WordPress content such as pages and posts.
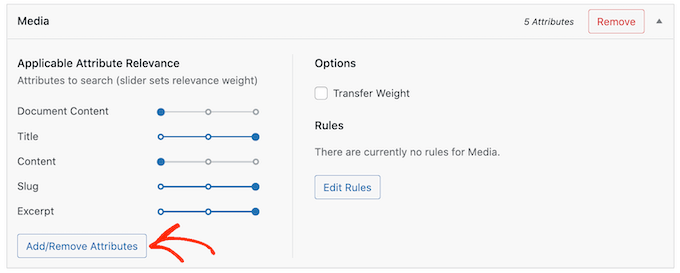
For each section, SearchWP shows the attributes it looks at when performing a search. In the following image, we can see that SearchWP searches the page’s title, content, slug, and the page’s excerpt.
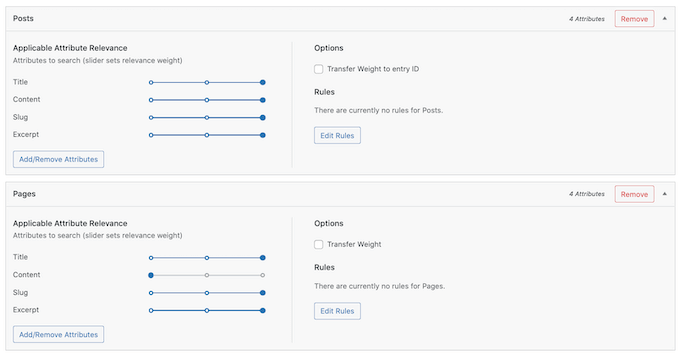
There is also an ‘Applicable Attribute Relevance’ scale for each attribute. This is the weight that SearchWP gives to each attribute when ranking its search results.
In the following image, we can see that a post’s title has more weight than its URL slug.
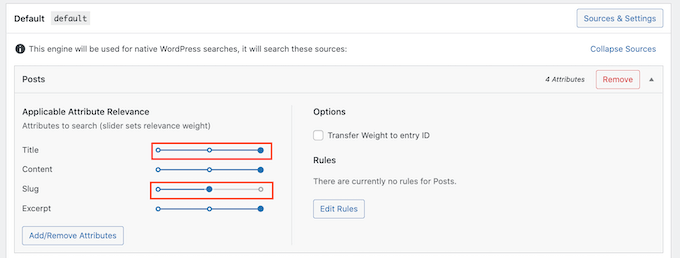
You can make an attribute more or less relevant using its slider.
There are no settings that are guaranteed to provide accurate results for every website. With that in mind, you may want to try different relevancy settings to see what gives you the most accurate search results.
You can also add different types of content to be included in your search results. For example, you can add PDF searching and indexing in WordPress if you have PDF files you want your visitors to be able to search for.
If you have any custom taxonomies or fields, then you can also tell SearchWP to look at this content when searching your site.
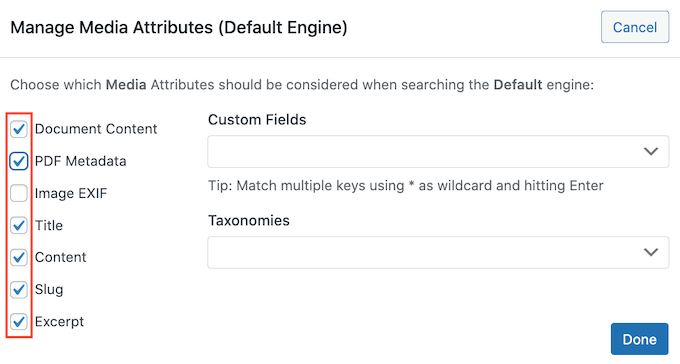
To add or remove attributes, click on the ‘Add/Remove Attributes’ button.
This opens a popup. To get SearchWP to ignore an attribute, simply uncheck its box.
If you want to add an attribute, then click to check its box.
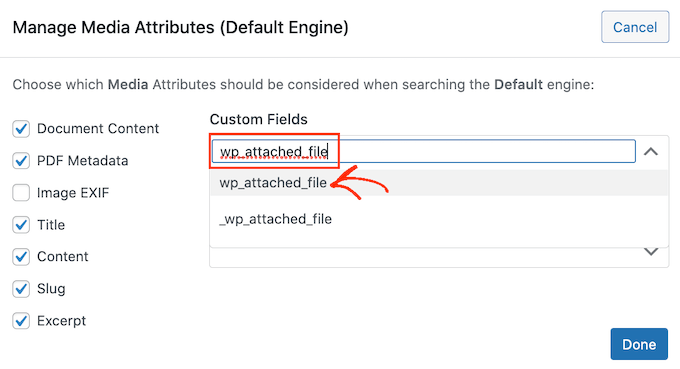
Want to include a custom field or taxonomy in your searches?
Simply type in the name of that field or taxonomy, and then select it when it appears.
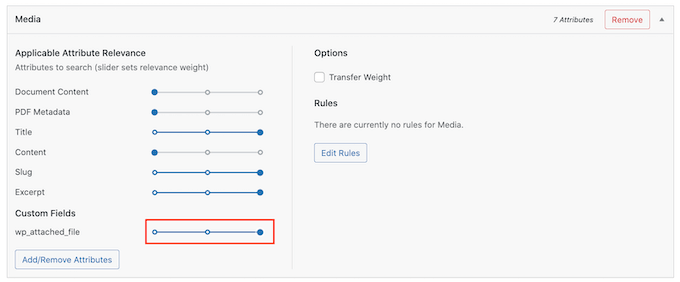
Once you’re happy with your attributes, click on the ‘Done’ button.
You can now change the relevancy for your new attributes following the same process described above.
To learn more, please see our step by step guide on how to improve WordPress search with the SearchWP.
Once you’ve finished customizing SearchWP’s settings, make sure to click on the ‘Save Engines’ button to save your changes.
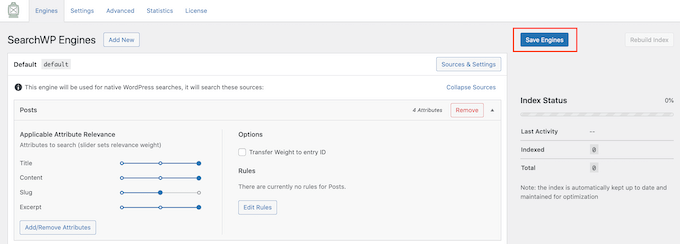
SearchWP will now use these new settings for all of its searches.
It’s worth visiting your site and performing a few searches just to check that you’re getting accurate results.
If you don’t see any improvement, then your WordPress theme may be performing its own search. This is known as a redundant search.
The easiest way to check whether this is happening with your theme, is by opening its search.php file.
To access this file, you’ll need an FTP client, or you can use the file manager of your WordPress hosting cPanel. If this is your first time using FTP, then you can see our complete guide on how to connect to your site using FTP.
Once you’re connected to your site, you can use FTP to open the wp-content/themes/ folder.
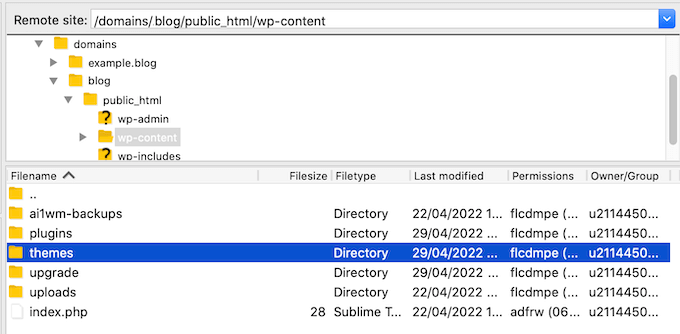
Inside the ‘themes’ folder, find the theme you’re currently using on your WordPress website. You can then open this folder and find the search.php file.
Next simply click on the search.php file and select ‘View/Edit.’
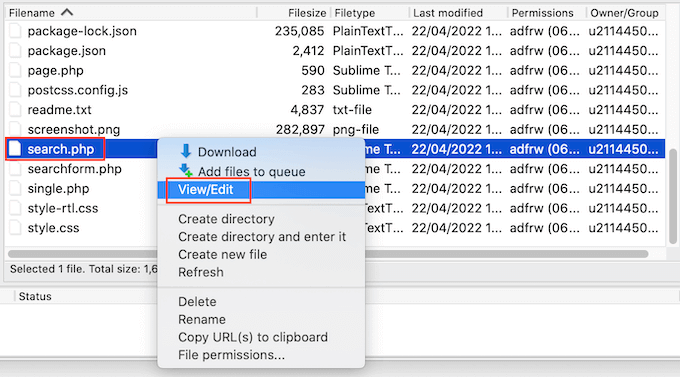
This will open search.php in your computer’s default text editor.
Now, check this template for any queries that contain query_posts, new WP_Query, or get_posts. This usually means that your theme is performing a redundant search.
If search.php has any of these queries, then we recommend switching to an alternative WordPress theme. To help you out, we’ve created a list of the most popular and best WordPress themes.
Another option is to hire a WordPress developer who can write a new template that doesn’t perform a redundant search.
How to Fix WooCommerce Product Search Not Showing Accurate Results
If you have a WooCommerce store, then search results can help customers find products to buy. To sell more products, you’ll need to display accurate product search results.
However, by default WordPress doesn’t look at your product reviews, attributes, or the product description when performing its searches.
SearchWP can easily fix the problems with WooCommerce search.
You can set up SearchWP by following the same process described above.
Once you’ve done that, go to Settings » SearchWP. You can then click on the ‘Sources & Settings’ button.
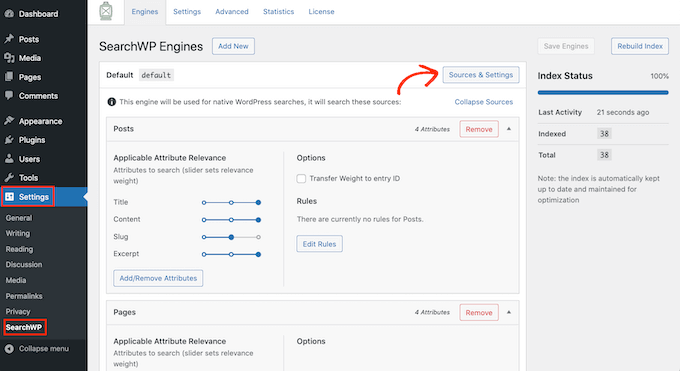
In the popup, make sure you check ‘Products.’
After that, just click on the ‘Done’ button to close the popup.
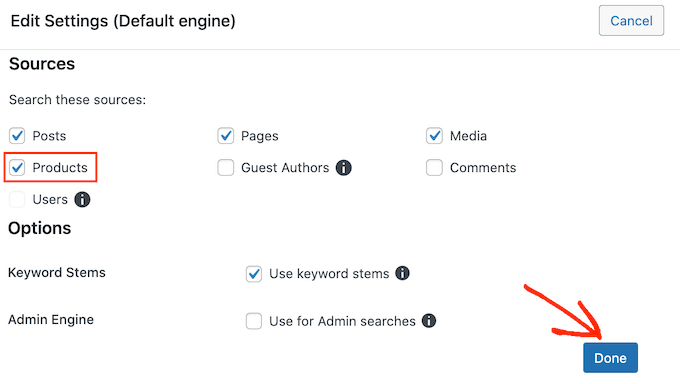
You can now scroll to the new ‘Products’ section.
Here, you can customize the attributes that WordPress uses in its product searches by following the same process described above.
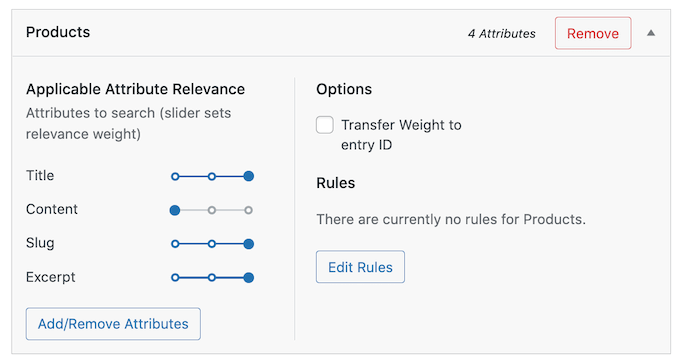
For more information, please see our complete guide on how to make a smart WooCommerce product search.
How to Fix Slow WordPress Search
Fast search helps visitors find what they’re looking for in less time. This will improve the user experience and can increase your pageviews and conversion rate.
Unfortunately, the built-in WordPress search isn’t particularly fast. As you add more content, you may notice that your site takes longer and longer to return the search results.
The good news is that there are ways to speed up your site’s search. If you’re using an advanced search plugin like SearchWP, then you’re already off to a great start.
SearchWP is designed to deliver search results, fast. It’s also fully customizable, so you can ignore some of your site’s content when performing a search. For example, you may tell SearchWP to ignore your media metadata. This can speed up your search by reducing the amount of content it has to look through.
You can also improve the search experience by adding live Ajax search to your WordPress site. This is a dropdown that guesses what visitors are searching for as they type, which can make your searches feel instant.

For more information, please see our guide on how to add live Ajax search to your site.
Anything you do to improve your website’s overall performance will also speed up your search. You can see our ultimate guide on how to speed up your WordPress site and boost performance.
We hope this article helped you learn how to fix problems with WordPress search not working. You may also want to see our guide on how to get a free SSL certificate for your website, or our expert comparison of the best chatbot software for small business.
If you liked this article, then please subscribe to our YouTube Channel for WordPress video tutorials. You can also find us on Twitter and Facebook.
The post How to Fix WordPress Search Not Working (5 Common Errors) first appeared on WPBeginner.

No comments:
Post a Comment