Do you want to add smart app banners in WordPress?
Smart banners are an easy way to promote your mobile app and get visitors to download it. If an iOS user already has your app, then the banner will encourage them to open the app for a better user experience.
In this article, we will show you how to add smart app banners to WordPress.

Why Add Smart App Banners in WordPress?
Many website owners create a companion mobile app where visitors can browse their content in a way that’s optimized for mobile.
Since these apps are designed for mobile devices, they often provide a better user experience. You can also show reminders, personalized content, offers, updates, and more using mobile push notifications. All of this means more engagement, conversions, and sales.
If you don’t already have a mobile app, then you can see our complete guide on how to convert a WordPress website into a mobile app.
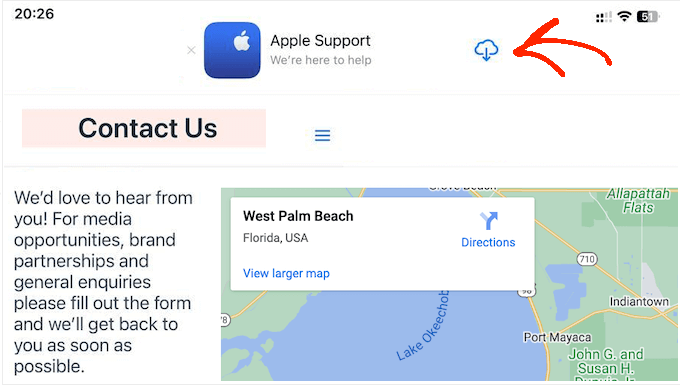
You can encourage iPhone and iPad users to download your mobile app using a smart app banner. This is a banner that appears at the top of the screen when an iOS user visits your site using the Safari browser.
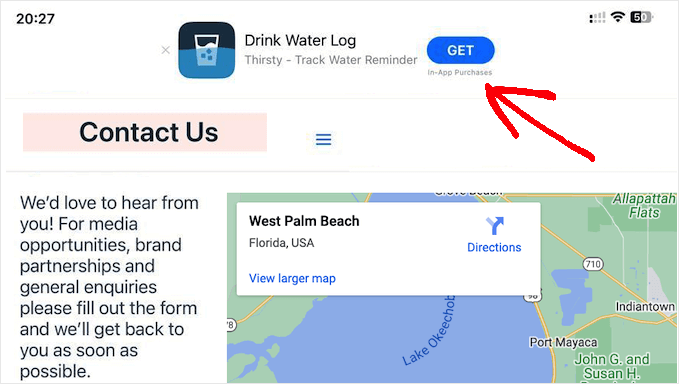
Visitors can click the banner to download your app from the App Store. If the visitor already has your app, then the banner will ask them to open the app instead. In this way, you can get more downloads and engagement.
If the visitor is using a non-Apple device or a different web browser, then WordPress will hide the banner from them automatically.
For example, the following image shows the same website in the Chrome mobile browser.
With that being said, let’s see how you can add smart app banners in WordPress. Simply use the quick links below to jump straight to the method you want to use:
Method 1: Using WPCode (Show a Smart App Banner Across WordPress)
The easiest way to add smart app banners to your WordPress website is by using WPCode. This free plugin allows you to show the same banner on every page and post using one line of code.
With that in mind, WPCode is the perfect choice if you want to promote a single iOS application. However, if you want to show different banners on different pages, then we recommend using method 2 instead.
When adding custom code to WordPress, some guides will ask you to edit your site’s functions.php file. We don’t recommend this, as even a small typo or mistake could cause common WordPress errors or even make your site inaccessible.
By using WPCode, you can add custom code to WordPress without any risks. You can also enable and disable code snippets with the click of a button.
First, you need to install and activate the free WPCode plugin. For more instructions, please see our beginners’ guide on how to install a WordPress plugin.
Upon activation, head over to Code Snippets » Add Snippet. Next, click the ‘Use Snippet’ button under the ‘Add Your Custom Code (New Snippet)’ option.
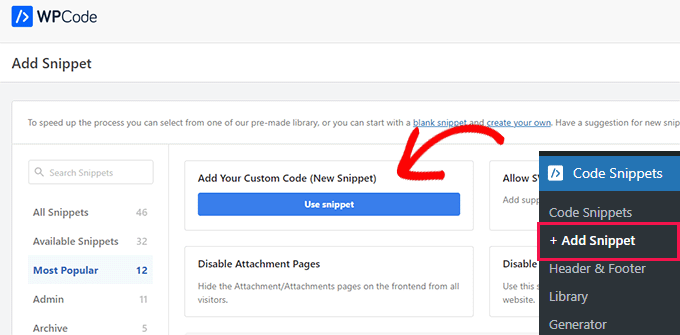
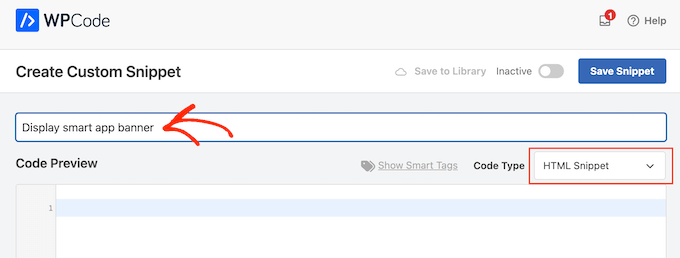
This will take you to the ‘Create Custom Snippet’ page, where you can type in a name for the code snippet. This is just for your reference, so you can use anything you want.
After that, open the ‘Code Type’ dropdown and choose ‘HTML Snippet’.
For the next step, you will need to know your application’s ID.
To get this information, open a new browser tab and head to the Apple Services Marketing Tools page. Here, type in the name of the application you want to promote and click on the ‘Search’ icon.

To see all the iOS apps that match your search term, simply scroll to the ‘Apps’ section.
Here, find the app you want to promote and give it a click.

At the bottom of the screen, you will see a ‘Content Link’.
The app ID is the value between id and ?. You will need this information in the next step, so either leave this tab open or make a note of the app ID.
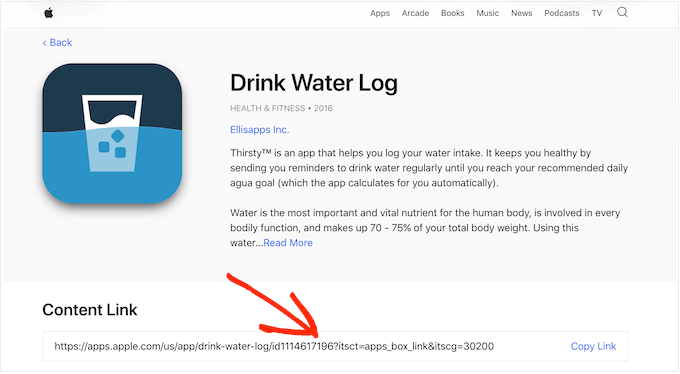
Now you have the app ID, switch back to the WordPress dashboard. You can now add the following snippet into the code editor, replacing the app ID with the information you got in the previous step:
<meta name="apple-itunes-app" content="app-id=12345678">
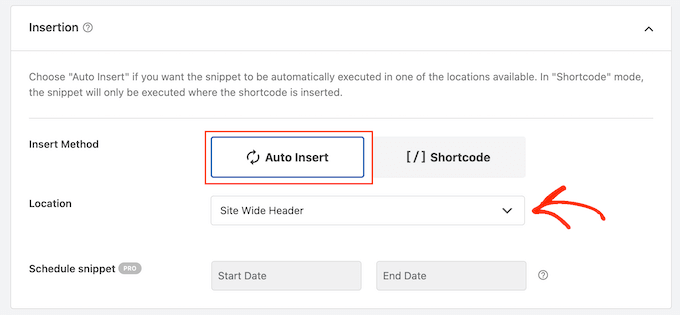
With that done, you must scroll to the ‘Insertion’ box. If it isn’t already selected, click on ‘Auto Insert’ and then select ‘Site Wide Header’ from the dropdown menu.
When you are ready, scroll to the top of the page and toggle the ‘Inactive’ switch to ‘Active’.
Finally, just click the ‘Save Snippet’ button to store your changes.
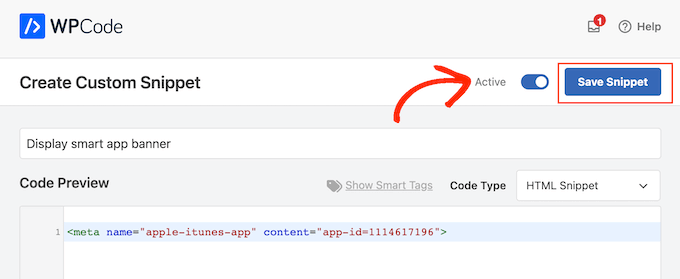
Now, the smart app banner will appear on your WordPress website.
How to Test the Smart App Banner Code in WordPress
The best way to test the smart app banner is by visiting your website on an iOS device using the Safari mobile app. In fact, the smart app banner won’t even appear if you try to view the mobile version of your WordPress site from desktop.
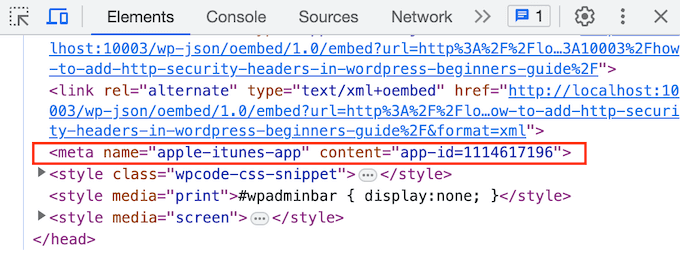
If you need to quickly check whether the code snippet is working, then one workaround is to use your browser’s Inspect tool. It allows you to see whether the <meta name> code has been inserted into your site’s <head>section, which suggests it’s working as expected.
To do this, go to any page or post on your WordPress blog. Then, right-click anywhere on the page and select ‘Inspect’.
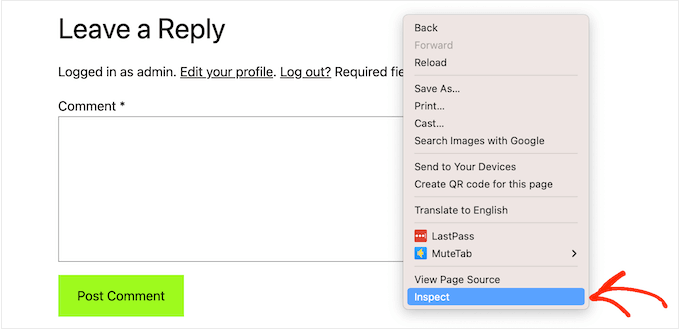
A new panel will open, showing all the site’s code.
Simply find the <head> section and click on its arrow to expand.
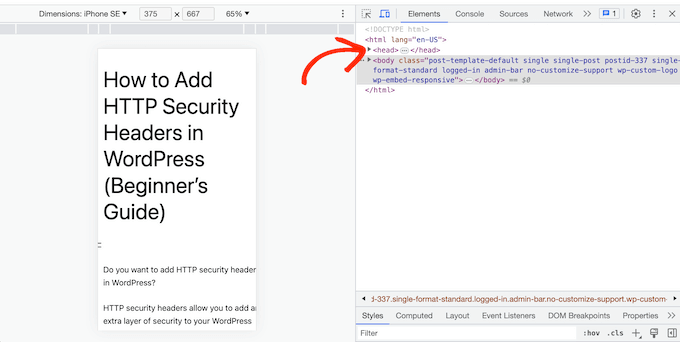
Now, look for the <meta name="apple-itunes-app"> code you added in the previous step.
If you see this code, then the smart app banner should be appearing on iOS devices.
Method 2: Using Smart App Banner (Add Banners to Specific Pages and Posts)
Sometimes, you may want to only promote apps on specific pages and posts. For example, you typically won’t show a smart app banner on sales pages and landing pages as the banner might distract from the main call to action.
You may even want to show different banners on different parts of your website. For instance, if you are an affiliate marketer, then you might have a list of apps you want to promote.
In this case, we recommend using the Smart App Banner plugin. This plugin allows you to show different banners on different pages and include affiliate data in those banners. These features make it a great plugin for affiliate marketers.
First, you will need to install and activate the Smart App Banner plugin. If you need help, then please see our guide on how to install a WordPress plugin.
Upon activation, you can add an app banner to specific pages or posts, the WordPress homepage, or across your entire website.
To start, let’s look at the app’s settings. Here, you can add a banner to every page and post or add a smart app banner to your homepage only.
To start, go to Settings » Smart App Banner and type the application’s value into the ‘App ID’ field.
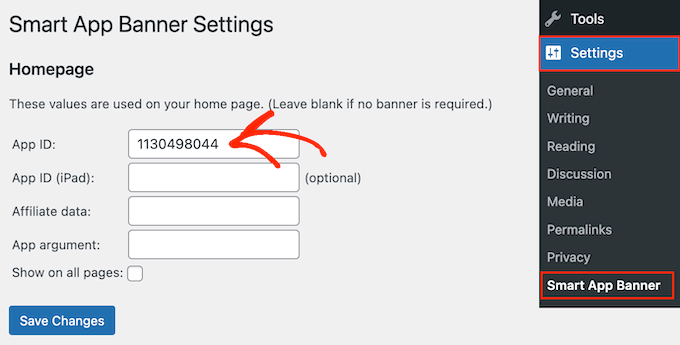
You can get this information by following the same process described in Method 1.
If you are using affiliate marketing to make money online blogging, then you can type your affiliate token into the ‘Affiliate data’ field. The information will vary, so you may need to log in to your affiliate portal or speak to your partners to get the right token.
After that, you can either check the ‘Show on all pages’ box or leave it unchecked. If you leave the box unchecked, then the app banner will only appear on your homepage.
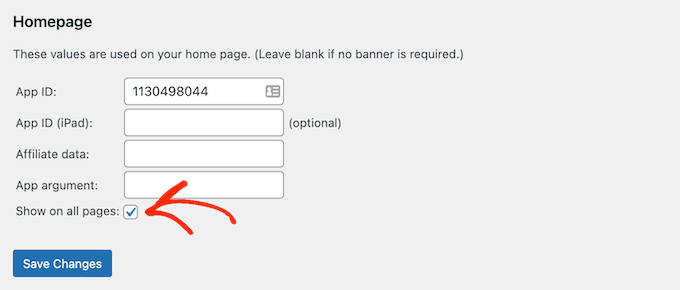
When you are happy with how the banner is set up, simply click on the ‘Save Changes’ button to make it live.
Do you want to add a smart app banner to specific pages and posts instead? This allows you to control exactly where the banner appears on your website.
For example, if you are an affiliate marketer, then you might promote different apps on different pages and then use Google Analytics to see which banners get the most conversions.
To do this, simply open the page or post where you want to add the banner. Now, find the new ‘Smart App Banner’ section in the WordPress content editor.
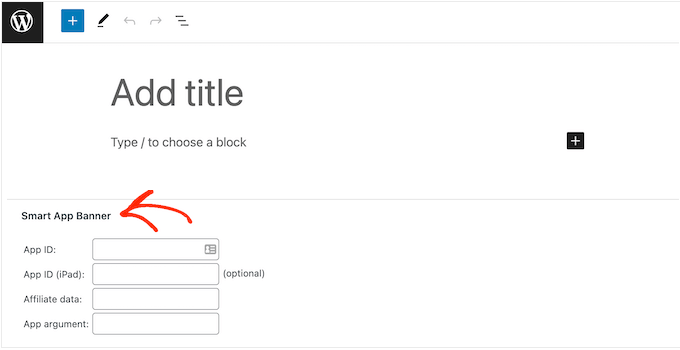
Here, just add the app ID and optional affiliate information by following the same process described above.
When you are happy with the information you have entered, just click on ‘Update’ or ‘Publish’ to make your changes live.
Then, you can simply repeat these steps to add a smart app banner to more WordPress posts and pages.
FAQs About Adding Smart App Banners in WordPress
In this guide, we showed you how to promote your mobile app on specific posts and pages or across your entire WordPress website.
If you still have questions, then here are our top FAQs about how to add smart banners to your WordPress website.
What is a smart app banner?
Smart app banners appear at the top of the Safari web browser and give users the option to open an app or download it from the Apple App Store.
Since they are created by Apple, smart app banners have a consistent design that many iOS users recognize. They only appear to people who are using iPhones and iPads running iOS 6 or higher.
Why can’t I see my smart app banner on desktop?
The smart app banner won’t appear on desktop computers, even if you view the mobile version of your site.
To see the banner in action, you will need to visit your site on an iPhone or iPad using the Safari mobile app.
Why can’t I see the smart app banner on my iPhone or iPad?
Smart app banners only appear on devices running iOS 6 or higher when you are using the Safari mobile app. If you don’t see the smart app banner, then you should start by checking you have the latest versions of both iOS and the Safari mobile app.
The smart app banner also detects whether the device can support the app and if the app is available in your location. If you don’t see the smart app banner, then it’s possible that your device has failed one of these checks.
Why has the smart app banner disappeared in Safari?
If you dismiss the banner by clicking the ‘x’ button, then it won’t appear again by default.
Depending on your mobile device, you may need to open a private browser tab, clear your cache or cookies, or perform some other action to reset your settings.
We hope that this article helped you learn how to add smart app banners in WordPress. You may also want to see our guide on how to add web push notifications to your WordPress site or our expert picks for the best WordPress popup plugins.
If you liked this article, then please subscribe to our YouTube Channel for WordPress video tutorials. You can also find us on Twitter and Facebook.
The post How to Easily Add Smart App Banners in WordPress first appeared on WPBeginner.

No comments:
Post a Comment