Do you want to add advanced gift cards in WooCommerce?
Gift cards allow your customers to buy store credit and then either keep it for themselves, or give it away as a gift. Since they’re so popular with shoppers, gift cards can help you get more sales and boost profits.
In this article, we will show you how to easily add advanced gift cards in WooCommerce.
Why Add Advanced Gift Cards in WooCommerce?
Whether you sell physical items or you sell digital downloads in WordPress, gift cards give your customers an easy way to buy store credits in advance. Although some shoppers may buy a gift card for themselves, they also make a very convenient gift.
By selling gift cards, you can make your WooCommerce store the go-to place for shoppers who need to get a present but are unsure what to buy.
This means more sales and more profits for your online store.
Gift cards can also help spread the word about your brand, particularly if the shopper buys a gift card for someone who hasn’t heard of your online store yet.
Convincing a new customer to make their first purchase is often a challenge. However, if someone gets a gift card, then they’re almost guaranteed to use it, even if they’re not familiar with your store.
When this person uses their gift card, you will be able to collect their contact information to build your email list in WordPress and encourage first-time shoppers to become loyal repeat customers.
That being said, let’s take a look at how you can easily add advanced gift cards in your WooCommerce store.
How to Add Advanced Gift Cards in WooCommerce
The easiest way to add advanced gift cards in WooCommerce is by using the free Advanced Coupons plugin with the Advanced Gift Cards for WooCommerce premium addon.
You’ll need both plugins installed in order to create gift cards. That’s because the gift card addon needs the core Advanced Coupons plugin in order to work.
Advanced Coupons is the best WordPress coupon code plugin on the market. It allows you to create coupons to boost your sales and grow your business.
In this guide, we’ll be using the free Advanced Coupons plugin. However, there is an Advanced Coupons Premium plugin that adds extra features such as BOGO coupons, cart conditions, and the option to auto-apply coupons. Both the free and premium versions are fully compatible with the Advanced Gift Cards for WooCommerce addon.
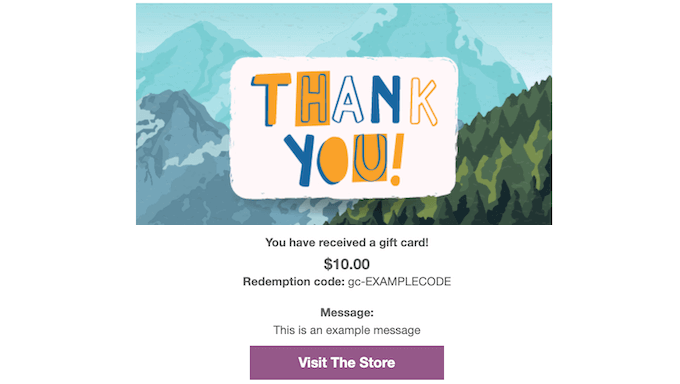
In the following image you can see an example of a gift card, created using Advanced Gift Cards for WooCommerce.
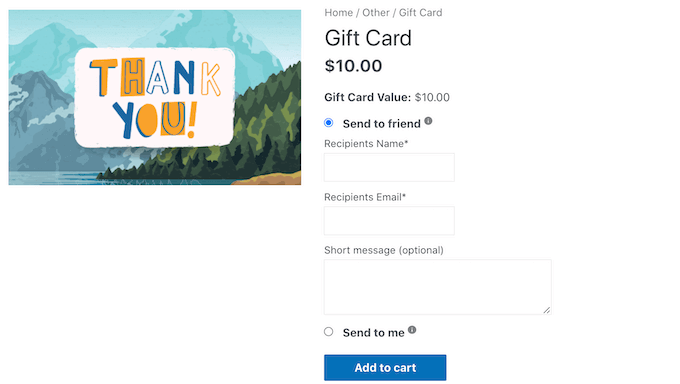
When the customer buys a gift card, WordPress will send them an email with a unique coupon code that they can use on your online store.
To create and sell gift cards, you’ll need to first install and activate the free Advanced Coupons plugin. If you need help, then please see our guide on how to install a WordPress plugin.
Then, you’ll need to install the Advanced Gift Cards for WooCommerce addon.
After activating this premium addon, your first task is entering your Advanced Gift Cards license key. You’ll find this key in the purchase confirmation email you got when you purchased the Advanced Gift Cards addon.
You can also get this key by logging into your Advanced Coupons account. In your account, click on ‘View Licenses.’

Simply copy the key that appears in the ‘License key’ field. If you have bought other Advanced Coupons plugins and addons, then make sure you’re using the license key for the Advanced Gift Cards addon.
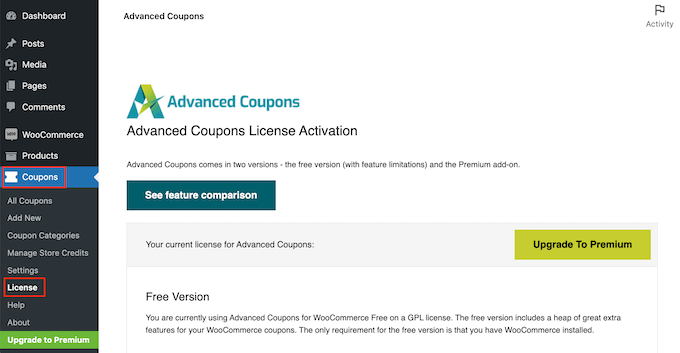
After you’ve done that, go to Coupons » License in your WordPress dashboard.
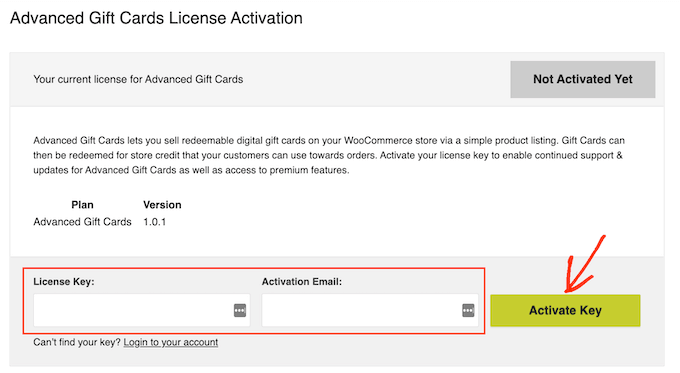
Next, scroll to the Advanced Gift Cards License Activation section. You can now go ahead and paste your key into the ‘License key’ field.
After that, type in the email address that you used to buy the Advanced Gift Cards addon. Then, just click on the Activate Key button.
You’re now ready to create gift cards for your customers. To get started, go to Products » Add New.
First, you need to type in a title for your gift card in the ‘Product name’ field. Most WooCommerce themes show the product name at the top of the product’s page, so it’s one of the first things that shoppers will see.
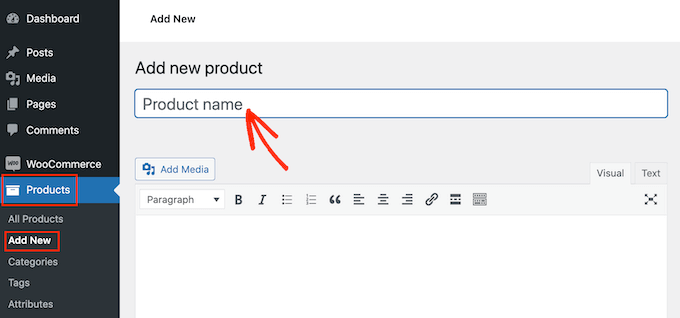
Directly below the ‘Product Name,’ you can type in a description for your gift card. To get more sales, your description should be helpful, informative, and convincing.
After that, scroll to the ‘Product Categories’ section. Product categories allow your customers to easily browse related products on your WordPress website. This can help you sell more products and make more money.
To add this gift card to a category, simply check the category’s box.
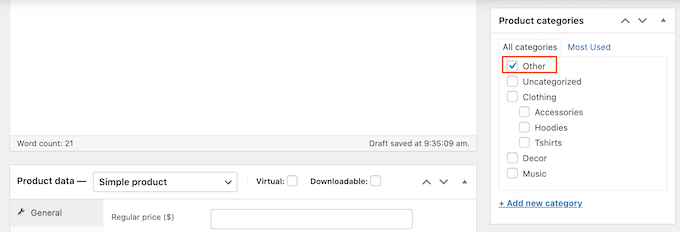
Another option is to create a new category, such as a special Gift Card category where shoppers can browse through all of your different cards. You can see our guide on how to add categories in WordPress for detailed steps.
Once you’re done selecting a category, scroll to the Product Data section and open the dropdown that shows ‘Simple product’ by default.
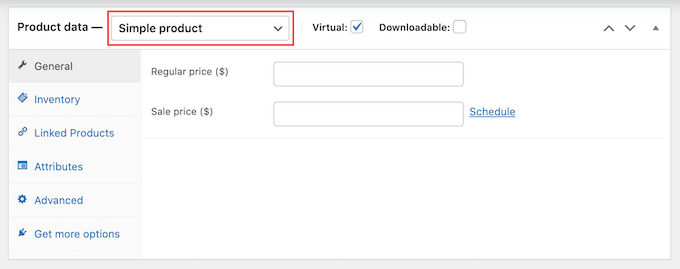
Then, go ahead and click on the new ‘Advanced Gift Card’ option. WooCommerce will now show all the settings you can use to create your gift card.
In the ‘Regular price’ field, go ahead and type in how much this card will cost to buy.
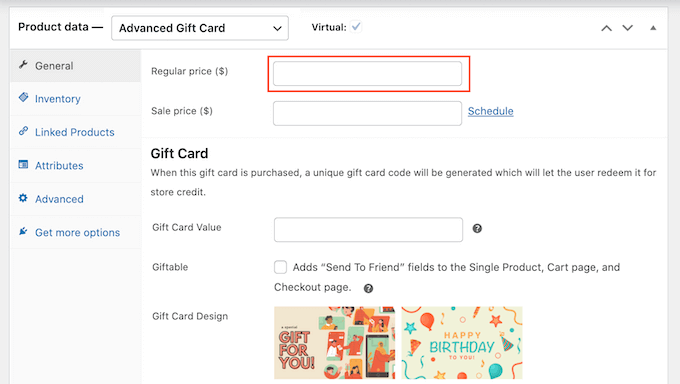
When a customer buys this gift card, your store will create a unique coupon code. The customer can then enter this code at your store’s checkout, similar to any other smart coupon in WooCommerce.
In Gift Card Value, type the amount that will be credited to the customer’s account when they use this coupon. This will usually be the same as the gift card’s Regular Price.
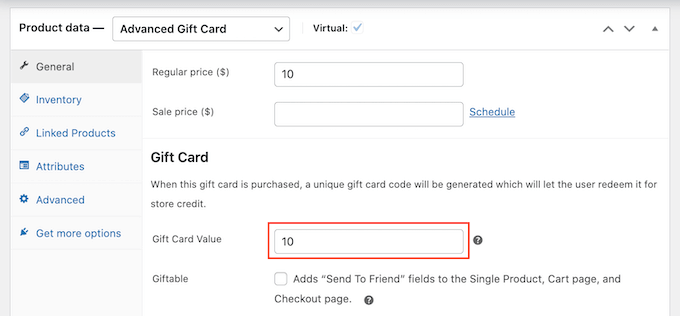
By default, Advanced Gift Cards will send the card to the buyer’s email address. However, gift cards are usually meant for other people such as a friend or family member.
With that in mind, you may want to give customers the option to send this card to a different email address, as you can see in the following image.
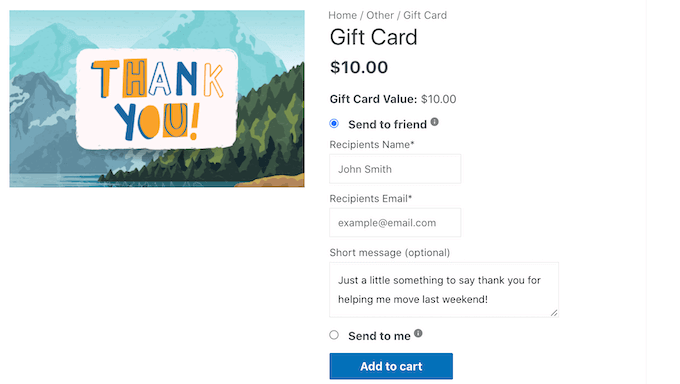
To give your customers this choice, check the ‘Giftable’ box.
Now, your customers can choose whether to send the gift card to their own email address, or a different address.
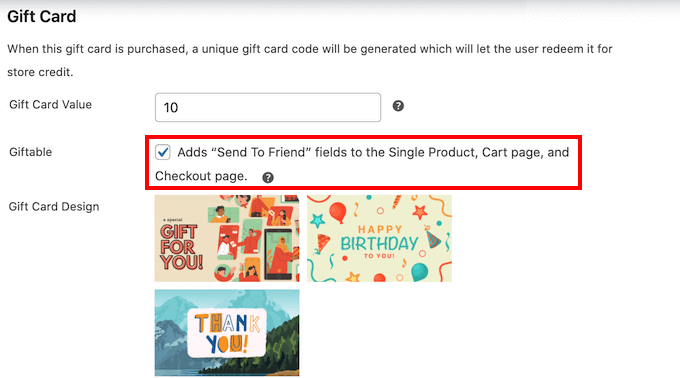
When a customer buys a gift card, the plugin will send them an email with their coupon code plus some information about your store.
Advanced Gift Cards has several ready-made designs that you can add to these emails, as you can see in the following screenshot.
To use one of these designs, scroll to the Gift Card Design section and then click on any of the ready-made designs.
To preview how your emails will look, simply click on the Preview Gift Card Email button.
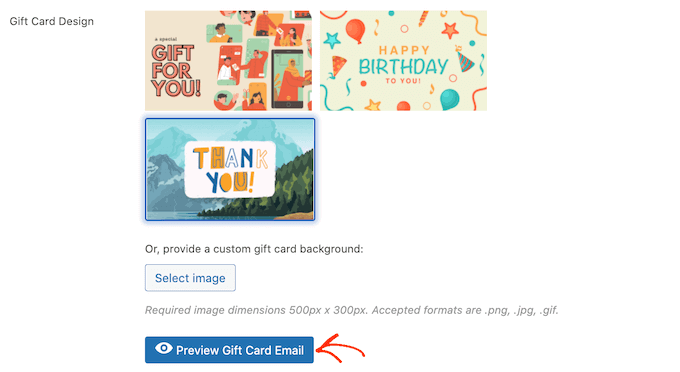
This will open a popup showing how your email will look with your chosen design.
Another option is uploading an image of your choice. For example, you might use web design software to create a Thank You image that features your store’s unique branding.
To use your own image, click on the ‘Select image’ button.

This will open the WordPress media library where you can either choose an image or upload a new image to your WordPress blog from your computer.
There are few other settings that you may want to take a look through. However, this is all you need to create an advanced gift card in WooCommerce.
Before you publish your gift card, you may want to customize the email that’s sent to every customer who buys this product.
With that in mind, click on the Save Draft button to save your gift card without publishing it to your online store.
How to Customize the Advanced Gift Cards Email
Whenever a customer buys a gift card, they’ll get an email with instructions on how to use their card.
You may want to customize this email, so it better aligns with your brand and has the messaging you need. You may also want to add any information that you feel is missing from the default email.
To edit this email, go to WooCommerce » Settings. Once you’ve done that, click on the ‘Emails’ tab.
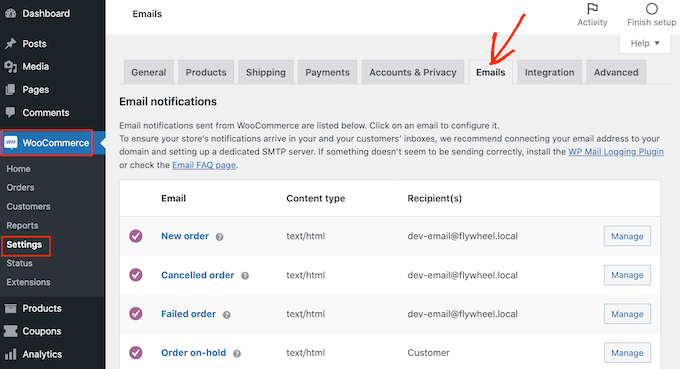
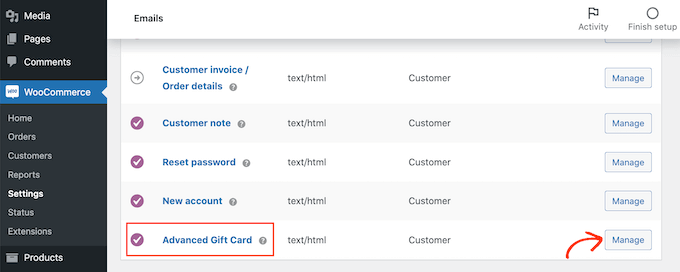
On this screen, scroll to find the ‘Advanced Gift Card’ email.
Then, click on its ‘Manage’ button.
You will now see the template that Advanced Gift Cards uses for all of its emails.
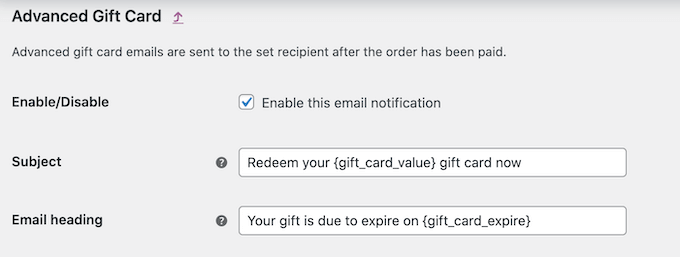
You may want to start by editing the email heading and subject.
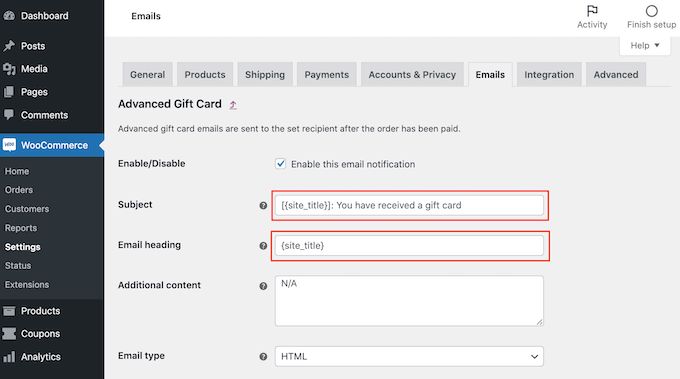
One option is to simply type in plain text into these fields. WooCommerce will then use this text for all of its gift card emails.
You can also add dynamic text. This is text that will update automatically based on factors such as the value of the gift card or the date when it is due to expire.
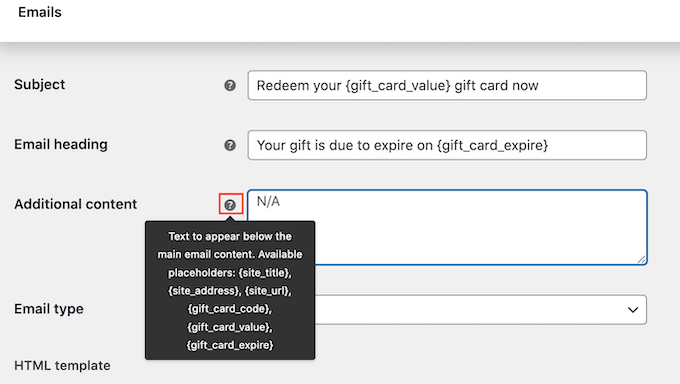
Dynamic text can help you create more helpful and engaging emails. To see all the dynamic text that you can use, simply hover your mouse over a field’s ‘?’ icon.
You will then see a popup that shows all the different dynamic text you can use in this field.

Now, you can simply type this dynamic text into the field, and WooCommerce will handle the rest.
You can even use a mix of plain text and dynamic text, as you can see in the following image.
Want to add some more text to the default email? Then you can type it into the ‘Additional content’ box. This text will appear beneath the main email content.
As before, the ‘Additional content’ box supports both plain and dynamic text. To see the different dynamic text that you can use for your additional content, just hover your mouse over its ‘?’ icon.
When you’re happy with your email, click on the ‘Save changes’ button.
You’ll want to make sure all of the emails sent from your WooCommerce store go to the recipient’s email inbox and not to the spam folder.
The best way to do this is by using an SMTP service provider to improve email deliverability. For more details, see our guide on how to fix WordPress not sending email issue.
We recommend using the free WP Mail SMTP plugin to get started.
Once you’ve set up your emails, you’re ready to start selling your gift card.
To publish your gift card product, simply go to Products » All Products. On this screen, find the gift card that we created earlier, and click on its ‘Edit’ button.
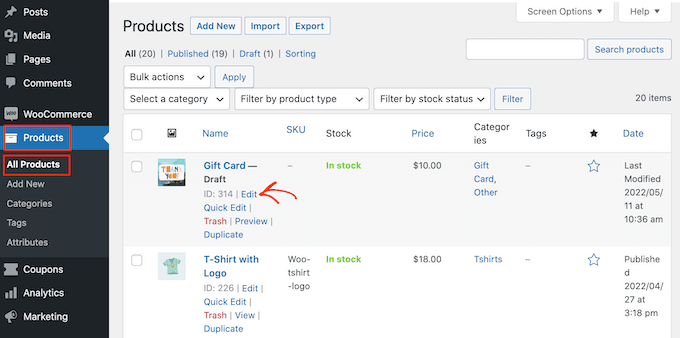
After that, go ahead and publish your gift card by clicking on the ‘Publish’ button. This gift card will now appear on your WooCommerce store, ready for shoppers to buy.
We hope this article helped you learn how to easily add advanced gift cards in WooCommerce. You may also want to check out our guide on how to create a WooCommerce popup to increase sales and the best WooCommerce plugins for your store.
If you liked this article, then please subscribe to our YouTube Channel for WordPress video tutorials. You can also find us on Twitter and Facebook.
The post How to Add Advanced Gift Cards in WooCommerce (Easy Way) first appeared on WPBeginner.

No comments:
Post a Comment